Preamble: This is a re-post of an entry from February 2020. Occasionally like to repost entries from my 15 years of writing my blog because I think the entry is still relevant.
Over the past few years I’ve noticed less and less folks using grads, and I think it’s a shame they aren’t using them. There is a general opinion now that grads are not required for digital photography but I beg to differ on this. Ultimately: the choice is yours, but it’s also my prerogative to try to change your mind :-)
Today I’d like to discuss the validity in still using Grads in an age where digital cameras have so much dynamic range that many believe that grads are no longer required. To do this, I need to go over what happens to the exposure when we apply grads.
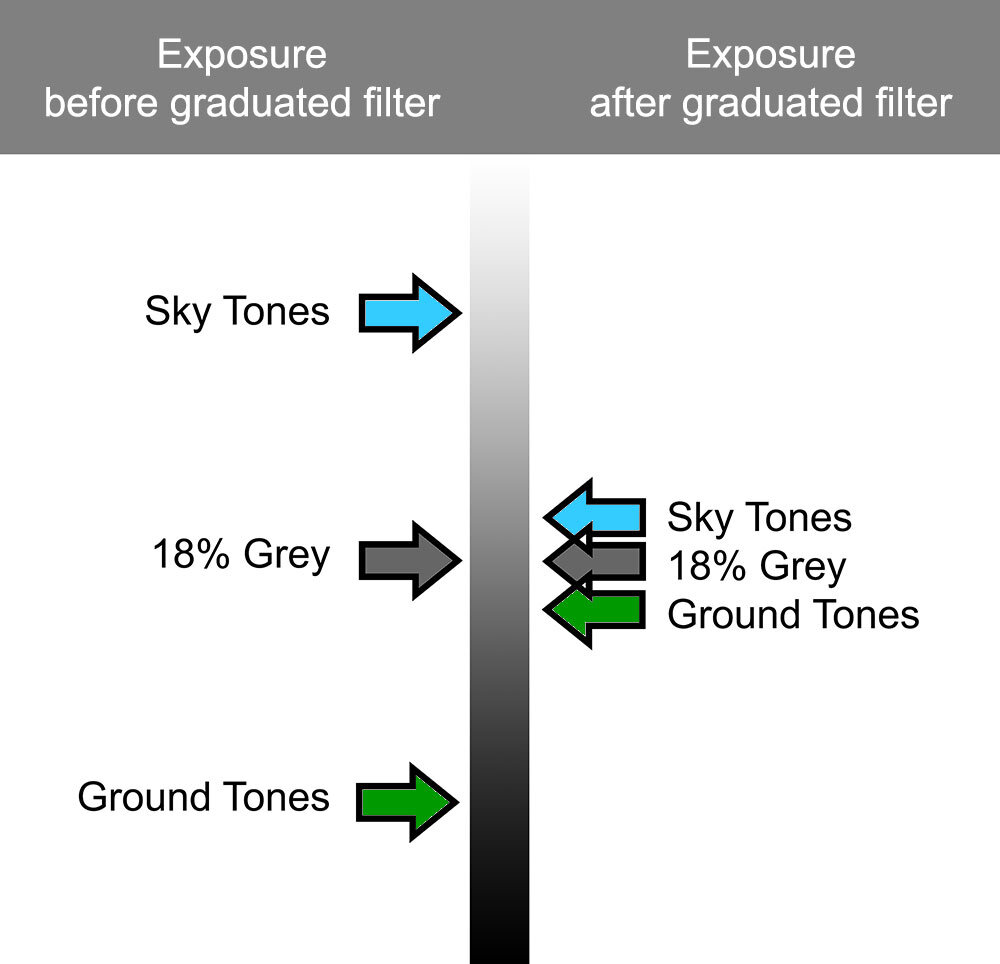
When using Aperture Priority, the camera automatically re-balances the exposure when a grad is applied (this does not happen in manual, which is why I mostly use Aperture Priority for most of my daylight work):
As you can see, the grad reduces the difference in contrast between sky and ground. And since the camera wants to take an average between the two values, we find the sky and ground moving towards mid-grey (18%).
In the above illustration you can see that the ground values are now lighter once the grad has been applied. This is key to my post today. When you apply grads, what you are essentially doing is opening up the shadow detail in the histogram / exposure of the photo.
Consider the histogram on the left. No grad was applied, so we end up with a classic ‘double humper’. The ground has been squeezed into the lower tones of the histogram while the sky has been squeezed into the upper registers of the histogram.
Note where 18% grey is.
The ground is essentially underexposed, while the sky is overexposed.
Also consider that the ground is residing in the shadow ‘darker’ area of the histogram. This results in loss of tonal information in the shadows as many dark tones are being quantised. Many tones become one.
Now let’s consider the same image shot with a graduated filter:
The ground values have been moved towards the middle area of the histogram. Same for the sky values. The important points to consider are:
The shadow information has been opened up (marked in red). We now have more tonal information stretching over a longer tonal scale way down into the shadows.
The highlight information has also been opened up (marked in red). We now have more tonal information stretching over a longer tonal scale way up into the highlights.
For me, the main reasons why I use grads are:
I wish to avoid underexposed ground and overexposed sky
I want to go home with a pleasing negative to work with.
I don’t want to have to jump through additional hoops in the processing to figure out if the image is any good. Working with an image where the sky is overexposed and the ground is underexposed isn’t very inspiring at all !
if I didn’t grad, I’d have to process every file I shot to see if they were any good before I began work.
Working with a nicely balanced exposure straight out of the camera can be, and often is, a very inspiring way of working. You can see straight away whether the composition and image works or not, and I remain engaged.
Engagement is the key for me.
I don’t want to struggle with bad exposures to make them nicer. I want to work with images that inspire me, and that means pleasing, balanced exposures.
If I go home with a nicely balanced exposures, I am more likely to work with them. Conversely, having to trawl through hundreds of images with dark foregrounds and bleached out skies wondering if they might be good once I’ve put them through my editor of choice isn’t going to fuel my creativity. And it’s certainly not going to inspire me.
Post amble: I’d also like to point out that most folks assume that grads are used to darken the sky, or to stop the sky from being over-exposed. That’s not really the whole story. Grads reduce the dynamic range between ground and sky: which is why I focussed in the post above about the ground becoming lighter.
If you use aperture priority the camera will re-adjust the exposure as it tries to balance out ground and sky. As you push the grad down into the frame, the contrast between ground / sky is reduced and when that happens, the camera has to re-compute where mid-grey is.
So grads don’t just control the sky, they also control ground exposure. When you use them, the difference in exposure between ground and sky is reduced, and this is why my diagram at the start of the post illustrates ground becoming lighter (moving towards mid-grey) while the sky is also becoming darker (moving towards mid-grey).
Bear in mind that the human eye perceives everything as a mid-grey exposure, so this is why, even if you have loads of dynamic range, you are aiming for the ground, as well as the sky moving towards mid-grey.


