Grads still have a place in digital photography

Preamble: This is a re-post of an entry from February 2020. Occasionally like to repost entries from my 15 years of writing my blog because I think the entry is still relevant.

Over the past few years I’ve noticed less and less folks using grads, and I think it’s a shame they aren’t using them. There is a general opinion now that grads are not required for digital photography but I beg to differ on this. Ultimately: the choice is yours, but it’s also my prerogative to try to change your mind :-)


Today I’d like to discuss the validity in still using Grads in an age where digital cameras have so much dynamic range that many believe that grads are no longer required. To do this, I need to go over what happens to the exposure when we apply grads.

When using Aperture Priority, the camera automatically re-balances the exposure when a grad is applied (this does not happen in manual, which is why I mostly use Aperture Priority for most of my daylight work):

exposure-grads.jpg

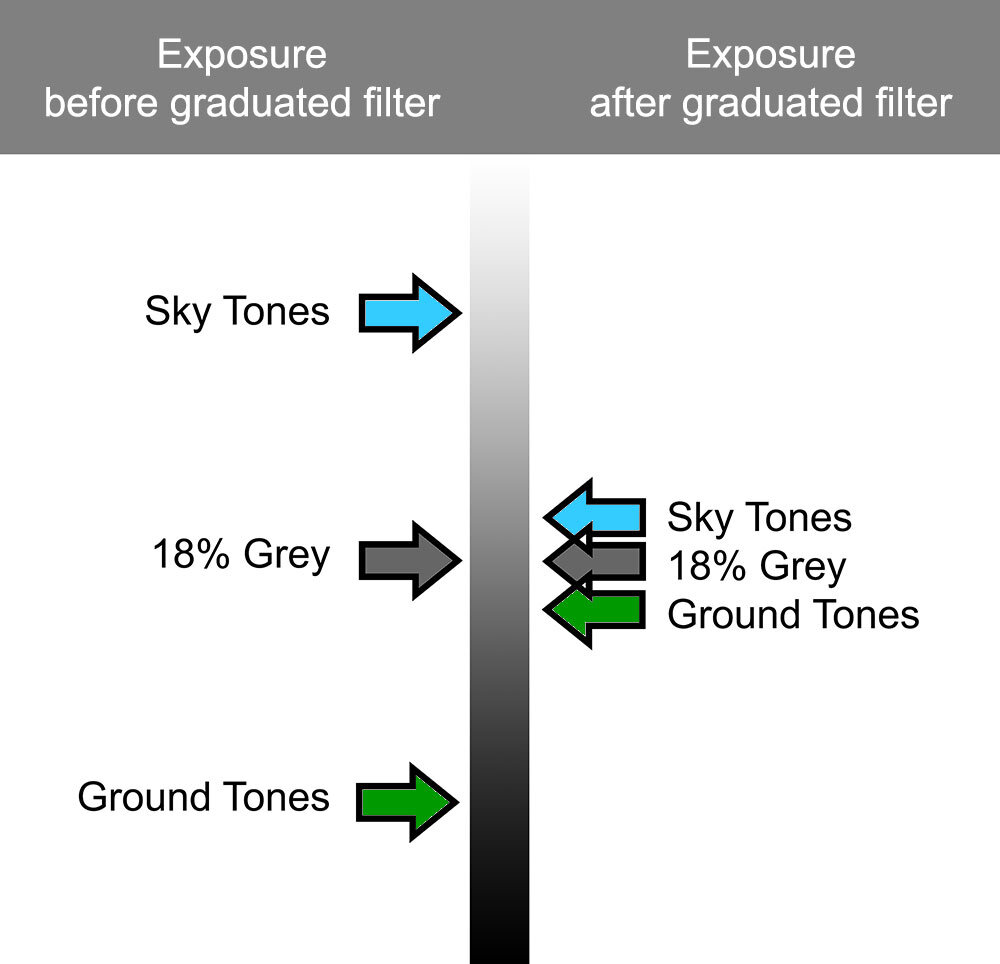
As you can see, the grad reduces the difference in contrast between sky and ground. And since the camera wants to take an average between the two values, we find the sky and ground moving towards mid-grey (18%).

In the above illustration you can see that the ground values are now lighter once the grad has been applied. This is key to my post today. When you apply grads, what you are essentially doing is opening up the shadow detail in the histogram / exposure of the photo.

sky-ground.jpg

Consider the histogram on the left. No grad was applied, so we end up with a classic ‘double humper’. The ground has been squeezed into the lower tones of the histogram while the sky has been squeezed into the upper registers of the histogram.

Note where 18% grey is.

The ground is essentially underexposed, while the sky is overexposed.

Also consider that the ground is residing in the shadow ‘darker’ area of the histogram. This results in loss of tonal information in the shadows as many dark tones are being quantised. Many tones become one.

Now let’s consider the same image shot with a graduated filter:

sky-ground.jpeg

The ground values have been moved towards the middle area of the histogram. Same for the sky values. The important points to consider are:

The shadow information has been opened up (marked in red). We now have more tonal information stretching over a longer tonal scale way down into the shadows.

The highlight information has also been opened up (marked in red). We now have more tonal information stretching over a longer tonal scale way up into the highlights.

For me, the main reasons why I use grads are:

  1. I wish to avoid underexposed ground and overexposed sky

  2. I want to go home with a pleasing negative to work with.

  3. I don’t want to have to jump through additional hoops in the processing to figure out if the image is any good. Working with an image where the sky is overexposed and the ground is underexposed isn’t very inspiring at all !

  4. if I didn’t grad, I’d have to process every file I shot to see if they were any good before I began work.

  5. Working with a nicely balanced exposure straight out of the camera can be, and often is, a very inspiring way of working. You can see straight away whether the composition and image works or not, and I remain engaged.

Engagement is the key for me.

I don’t want to struggle with bad exposures to make them nicer. I want to work with images that inspire me, and that means pleasing, balanced exposures.

If I go home with a nicely balanced exposures, I am more likely to work with them. Conversely, having to trawl through hundreds of images with dark foregrounds and bleached out skies wondering if they might be good once I’ve put them through my editor of choice isn’t going to fuel my creativity. And it’s certainly not going to inspire me.


Post amble: I’d also like to point out that most folks assume that grads are used to darken the sky, or to stop the sky from being over-exposed. That’s not really the whole story. Grads reduce the dynamic range between ground and sky: which is why I focussed in the post above about the ground becoming lighter.

If you use aperture priority the camera will re-adjust the exposure as it tries to balance out ground and sky. As you push the grad down into the frame, the contrast between ground / sky is reduced and when that happens, the camera has to re-compute where mid-grey is.

So grads don’t just control the sky, they also control ground exposure. When you use them, the difference in exposure between ground and sky is reduced, and this is why my diagram at the start of the post illustrates ground becoming lighter (moving towards mid-grey) while the sky is also becoming darker (moving towards mid-grey).

Bear in mind that the human eye perceives everything as a mid-grey exposure, so this is why, even if you have loads of dynamic range, you are aiming for the ground, as well as the sky moving towards mid-grey.


Lone Balloon

A slightly misty day allowed me to get these silhouettes of balloons.

More a case of 'spray and pray' for the right composition, it was not easy as I was using an Ebony field camera. But this shot I liked very much, and enjoy very much noticing that one balloon has more emphasis than the others.

Realm of Nature

I have a backlog of images to work on from the past five years. I don’t mind this at all, as I like to know there is something in the chest, for that rainy day when I wish to work on something and have some free time.

Many years ago, I always felt that if I had not worked on images as soon as I’d shot them, then I would lose momentum or would never get around to them. I’ve found that not to be the case for me now, and I currently have a beautiful set of images from Senja Norway from 2020 to work on at some point, as well as recent images from Argentina and Bolivia from this year to work on as well.

Occasionally a set of images get away from me though.

I published the images above in my newsletter in 2019, but never got round to putting them on this website as a gallery. I just stumbled upon them today and it was such a delight to find them.

I must admit that I never thought I would get to a point in my photography where I would overlook a set of nice images such as these, but that is just the way it is I suppose.

There is something important about remaining fluid in what you do, and always keeping moving forward. I am mostly methodical in my approach. Not so chaotic. I prefer to complete work, and if it’s not finished, will strive to complete it. But I’ve been thinking lately that I now have learned that some things have to hover in the ‘incomplete’ stage for some time, and that them being in an incomplete stage is perfectly ok to do so.

I had plans for this set of images, but Covid got in the way, and kind of derailed me. Them surfacing today reminded me of the hopes and focus I had at building a more comprehensive set, and has spurred me on to thinking how I can get round to completing the work in the next year or two, schedule permitting.

Suspended Reality

My original motivation for picking up a camera was to record my travels. Then, as time passed, my priorities changed and the pursuit of images became the reason why I travelled. From that point onwards, I think I was on a trajectory towards creating (hopefully) some kind of art with what I do, and I suspect it is the same for you. I would hope as a reader of this blog, you have similar aspirations with your work.

Suspended Lagoons, Lençóis Maranhenses, April 2024

Creating beautiful or ‘art’ pictures isn’t really how I would define what motivates me. I think what I’m really attracted to, is creating a sense of suspended reality in my images. I am not a verbatim shooter, and although I respect and understand that for some, photography is only truthful when the work is not edited (manipulated is such a loaded word), but I have always thought that photography cannot convey reality because how can one translate a 3D moment in time to a 2D interpretation and give a true account of it? It’s just not possible as even the choice of angle of view when made, can greatly influence what the viewer believes.

So for me, I’ve always considered that photography is an interpretation. It is a point of view, and we should all embrace the idea that with our camera, we have the potential to show others ‘our personal interpretation’, or convey through omission and inclusion what we want the viewer to focus on.

I particularly love images where upon initial viewing, one can appreciate their beauty but also, not fully comprehend what is going on. This is why I think I am attracted to abstract shapes and patterns in vistas. Nature does not tend to be orderly, or to show design as if man made, and if I find it in the landscape by careful composition, then I will use it.

If one can frame abstract shapes carefully, or perhaps exclude points of reference that will allow the viewer to understand what is going on (like a horizon, or a clear sense of scale), then the viewer cannot help but hunt for an understanding. The eye will keep searching.

In this shot made in Lençóis Maranhenses this past April, I deliberately shot two lagoons intersecting with the slope of a dune. I was attracted to this composition more so because the intersecting dune slope bled into the surrounding landscape. One does not see the slope, instead one sees two ellipses with a diagonal line intersecting them.

I don’t for one minute assume the picture is a deep puzzle. I am merely trying to convey / explain why I make the images I make. I think it does not take too long to figure out the scene, but by removing a bit of detail here and there (the dune slope in this case), or by having nothing around the edges of the frame to give context, then the lagoons appear to be almost suspended in air, and the viewer’s eye has to ‘look again’ to find a foundation of understanding on which to build a complete picture.

Working your aspect ratio muscle (re-published)

preamble - this post was published in January 2019. I am digging through my earlier posts looking for relevant articles. I have written so much in the past 15 years, and I hope / feel that these are still relevant.


I’ve been saying for many years now, that certain aspect ratios are easier to work in than others. Choosing the right aspect ratio for your own aesthetic temperament will aid you in finding compositions, whereas working with a difficult aspect ratio will hamper you. The thing is, you need to find out which aspect ratios work for you.

I’m still surprised that so many buy a digital camera and don’t consider the aspect ratio it shoots in. I have always thought that 3:2 is a particularly difficult aspect ratio to work in and choosing a less panoramic format such as 4:3, 4:5 or 6:7 would be easier to help you compose in.

Anyway, the reason why I am writing this post today is to say that by choosing different aspect ratios to work in, you force your eye to move into regions of the frame that you don’t normally visit with your eye.

If we consider the 3:2 format below, I’ve marked the region where most of us tend to spend time with our eye in black. The white areas of the frame are where we spend less or no time looking in.

area-of-most-use.3-2.portrait.jpg

I like to think of the black areas of the frame as ‘concentrated areas of experience’ with the white areas being ‘areas of little or no experience’.

If you choose to shoot in another format for a while, the different shape of the chosen aspect ratio will force your eye into areas of the frame that you wouldn’t ordinarily visit.

I found with square, my eye was visiting more of the frame, as is illustrated below

area-of-most-use.jpg
P1010941.jpg

Interestingly, I found my eye had less to travel to reach the far corners of the frame than in a 3:2 format. My ‘area of experience’ isn’t too far away from the corners of the frame.

As a result, I started to put objects at the far corners of the frame.

This isn’t something I was ever comfortable doing with 3:2 or 4:5.

After shooting square for a few years, I found that when I did return to 4:5 or 4:3, I found that all those exercises of putting things in the far corners of my square aspect ratio helped me use those corner and edge areas of the rectangle aspect ratio. As in this picture below:

4x5.jpg

Working with different aspect ratios is a good exercise to do. Move around between them too much and perhaps you won’t learn anything as I do believe you need to settled into one or two ratios for a few months if not years. But certainly it is true for me, that by moving to a different aspect ratio for a while, has changed my photography and how I compose when I have returned to an aspect ratio I used many years ago.

Your visualisation skill is like a muscle. If you don’t use it, you lose it. If you never force your eye into the corners of your frame then I think you lose the skill to visualise compositions that can produce very dynamic work.

Camera height

Preamble: this post was originally posted in January 2020. I am going through some of my older posts, as I think many, several years after writing them, are still relevant. I hope you think so too :-)


I am in Hokkaido this month and I’ve been reminiscing about some of the images I have made over the past few years here, and one in particular required me to be high above the ground to accomplish what I saw in my mind’s eye.

Hokkaido-(14).jpg

This photo was made by being perched up high. While at ground level, I could see that the collection of trees in the bottom of the frame were clashing / hitting the row of trees at the top of the frame. To get the separation between them in my photograph, I had to go this height:

image-asset-2.jpeg

This is the actual photograph of me making the image you see in this post.

Camera height is often a critical part of composition. OK, my example to illustrate that is perhaps extreme, but I have had many times when I have wished to take photos from much higher than my tripod can reach to.

I have also had times when I have wished to take photos that are much lower than my tripod can compress down to. Going low allows me to compress the mid-ground, and it is also a useful device in removing any clutter or debris that is lying around on the ground. Going low also allows me to move objects that are on the ground closer to those objects higher in the frame. By bringing them together / closer, we can strengthen relationships between them.

Tripods don’t find compositions. They fine-tune them

I think camera height is an important consideration for composition. But I am always surprised to see many photographers doing this:

  1. Get out of the car

  2. Extend the tripod to eye-level

  3. Put the camera on the tripod

All of this, without really considering if the height of the tripod is correct for any possible composition they see.

For me, this is what should happen:

  1. Get out of the car

  2. Take the camera out of the bag

  3. Walk around with the camera looking for good compositions

  4. When you find a possible candidate for a good composition, try the composition from different heights: down low, mid-height, eye-level, and of course, from above my own eye-level.

  5. Once a nice composition has been found, set up the tripod to assist in keeping the camera in that ‘magic space’ that has just been found. You know - that ‘middle of the air’ place where the composition works.

So for me, having a very tall tripod is really invaluable. I have two tripods. One is over 7 feet tall, while the other is over 9 feet tall. I have used both fully extended many times, and I’ve been grateful to have the extended reach they have.

A word about centre columns

My tripods also have no centre column. For me, these get in the way and prevent me from putting the tripod so low that the camera is almost at ground level. So when I buy a tripod, I always buy one that is very tall, and also has no centre column.

There will also be occasions when you need the camera to be literally sitting on the ground. In these circumstances I take my camera off the tripod and actually sit it on the ground. I sometimes have to make a hollow in the earth to help support the camera to place it where I need to. But I also need to use a viewfinder that allows me to compose comfortably. For me, I have a 45º angle viewfinder on my camera. For you, you can either use your live-view, or buy a 90º angle finder for your camera (Nikon and Canon).

Tip: when working with cameras lower than you are : get low. That means having to lie on your tummy. You need your eye to be level with the view you’re seeing so you can balance it properly. Peering into a camera with your head sideways isn’t going to help.

Camera height is a critical part of composition. I have found many times that the same composition taken at different heights will have a ‘sweet spot’ where the height is just right for the composition to really gel.

When what is outside frame influences what is inside the frame

Preamble - this is a post that was originally published back in October 2020. I am finding much value in digging back through this blog.


This little area of Hokkaido is rather special to me. There are many rolling hills with bunches of copse together. When I am here, I am always striving to isolate groups of the copse with maybe a few single trees around them, but it’s so hard because there are often more complex, less attractive aspects of the landscape trying to creep into the shot.

‘To me, what you leave out of the frame is often just as important
or more important than what you choose to leave inside the frame’

As simple as this shot may appear, it took quite some effort to do, because I was constrained by a large forest just outside the bottom area of the frame. I found I had to go higher and higher up a hill to get enough clearance, and even then, in order to completely remove the unwanted forest, I had to settle on this composition:

Hokkaido-2018-(5).jpg

Due to the large forest (just outside the bottom part of the frame) being so close to the little trees, I couldn’t give the trees enough space below them. This forced me to push the two little trees towards the edge of the frame.

At the time of capture, I remember thinking ‘this is a little unusual’, as everything in the frame of interest is really bunched down at the bottom of the frame. Can I live with it?

‘I think all you can do is make the shot,
and leave the pondering for another time’
(we are best being editors when at home)

I think all you can do is make the shot, and leave the pondering for another time. And indeed, as I’ve lived with this image over the past two years I’ve grown to really enjoy it. To me, those little trees are so keen to be part of the copse. But they’re almost being pushed out of the scene.

So sometimes it’s ok to put subjects at the very edge of the frame. Sometimes it’s ok to create tension. I just think that it has to look like it was intentional. Otherwise most viewers will assume it’s a bad composition.

I would also like to add that by being restricted to composing this view because I was trying to avoid what is outside of the frame, I was forced to create a composition that is / was outside my normal habits or comfort zone.

Sometimes (if not all the time) restrictions and limitations are a good thing, and encourage an attitude towards innovation.

Steel Dunes, Scrabster, Scottish Highlands, 2024

There is power in ambiguity. The picture below could be of sand dunes, or perhaps a wave caught before it folds over. But the subject is neither. The title above is impressionistic in nature, non literal for sure. And I quite like that you are left to see in it what you see.

All Quiet

Dear reader,

I know I’ve been very quiet.

It may appear as though I have dissapeared. Well, that is usually a sign that I’m busy doing something else. A few things in the pipe line, one of which will be announced this late August / September.

Sorry for the silence. But I am busy.

Over the coming days, I intend to republish some old (but still very relevant) blog posts.

Thank you for visiting.