Visual blind spot

Yesterday I reposted an old blog entry about viewing images upside down. The main benefit of looking at your photographs upside down is that it forces your eye into areas of the frame that you rarely visit.

upside-down-1.jpg

You see, I have found that we all have a predisposition to walking through the frame a certain way. In my own case, I often walk through an image from left to right, but depending on the compositional content of the picture I will either start from bottom-left and end up at the top-right, or I’ll start at the top-left and end at the bottom-right.

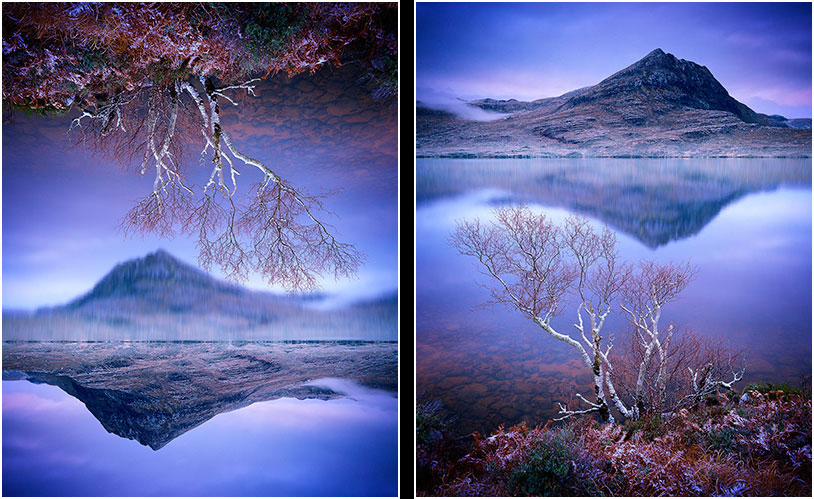
Left to right walking

Red marks the areas where you may be blind if you tend towards scanning images from left to right.Left image: left-to-right scanning from bottom to top. Right image: left-to-right scanning from top to bottom.

Red marks the areas where you may be blind if you tend towards scanning images from left to right.

Left image: left-to-right scanning from bottom to top.
Right image: left-to-right scanning from top to bottom.

In each ‘walk’ described above, I essentially ‘blank out’ the red regions of the image. In other words, if I walk from bottom-left to top-right, I spend very little time in the top-left and bottom right areas of the picture (see diagrams for a clearer illustration of this).

Until I turn them upside down that is.

That’s when I find that my eye is now forced to roam into regions of the image that I didn’t when I first walked through it.

Right to Left walking

Red marks the areas where you may be blind if you tend towards scanning images from right to left.Left image: right-to-left scanning from bottom to top. Right image: right-to-left scanning from top to bottom.

Red marks the areas where you may be blind if you tend towards scanning images from right to left.

Left image: right-to-left scanning from bottom to top.
Right image: right-to-left scanning from top to bottom.

Over the years I have been teaching workshops I have found that out of a group of six participants, two-thirds of them follow the same flow that I have whilst walking through an image. They start bottom left and end top-right, or if the subject demands it they start top-left and finish bottom-right.

With my ‘theory’ in mind,  how does your image tend to scan the image above,  when it is the right way up, and when it’s rotated 180º?

With my ‘theory’ in mind,
how does your image tend to scan the image above,
when it is the right way up, and when it’s rotated 180º?

Blind Spots?

I’ve come to the conclusion that regardless of whether my ‘theory is correct’, we all have visual blind spots when we look at an image. It may be due to how the composition is constructed, but the fact is that we spend more time in certain areas of the image than other areas, and those areas we don’t spend time in - are areas we often don’t visit.

This is a handicap of sorts. Because it means that we are visually blind to certain areas of the frame. This can affect us whilst outside composing our photographs and also while editing them.

So yesterday, I suggested that if it’s at all possible to review your images upside down, you should do so. It’s simply because our eyes tend to walk through an image a certain way, blanking out regions of the photograph that may be problematic to other viewers. By turning the image upside down, your eye is forced to enter into regions of the image it wouldn’t have done if it were the right way up. And by doing that, you are forced to notice things about the image that you were originally blind to.

You are effectively seeing the image anew, and you are being forced to confront areas of the picture that you were perhaps weak at working with at the time of capture.

We are all visually blind. I like to think that photography is the pursuit of learning to see again - of noticing the things we have a tendency to pass over. Turning images upside down can aid you in working around your visual blind spot.

Try it for yourself

With all of this in mind, try it with your own images. Ones you are happy with, and ones you are not so happy with. You can learn so much by rotating them. Do you notice things you didn’t see before? If you do, then think about why that is. Perhaps you have some blind spots when you walk through an image.

The Benefits of seeing Upside Down

I’m in Turkey this week with my view camera - I own an Ebony SW23 medium-format film view camera. Whilst looking through my older entries in my blog (which I recommend you doing sometime, as there’s now quite a lot of information here as I’ve been writing it for over 10 years), I found this article. Which I felt I would like to re-post today.

—-

Originally posted on May 5th, 2014

A few months ago, I re-entered the world of the view camera. It was a decision based on a few things.

Firstly, I'd been finding that I needed perspective control over some of the landscapes I've started to shoot over the past year. Buildings, and tall features in nature were causing me issues where I felt that the subjects began to lean backwards or converge together. Using a camera (or lens) with perspective control would alleviate that issue.

Upside down, and right way up

Upside down, and right way up

However, one of the challenges of using a view camera is that of composing upside down. I've found that rather than it being a hindrance, it has been beneficial in teaching me to notice things in the frame that I wouldn't ordinarily see at the point of capture.

One aspect of the human visual system, is that once we learn what an object looks like, we tend to keep it for reference point later on. This happens with everything that we see in our daily encounters. For example, when learning to read, once we know what some particular words look like, we no longer actually 'read' them (in my mind, this is tantamount to not seeing them). We simply scan past them. Take this sentence for example. Try counting the number of 'F's in it (please count it once):

FINISHED FILES ARE THE RESULT OF YEARS OF SCIENTIFIC STUDY COMBINED WITH THE EXPERIENCE OF YEARS.

How many 'F's did you count? Most folks tend to count three. There are actually six. The reason why you probably got somewhere around three, is because your mind has learned to 'scan' words such as 'OF' - you don't actually read them. Instead, your brain passes over them because it learned many moons ago that it's really laborious to read words like this all the time.

Another example to consider is that of a room you know so well. Once the ornaments and furniture have been in place for a while, you tend to pass over them with your eye. But if someone comes in and re-arranges something, or changes something, you'll more than likely pick up on the change when you enter the room. Rather than having to 'see' everything, as if for the first time, each time you enter the room (which would be really exhausting on your visual system), your eye tends to pass over familiar objects.

Now, photography is really the art of being able to enjoy the subtleties and nuances of familiar objects. Like taking a still-life art class, where we are asked to look at a vase of flowers and draw it, the act of making pictures is really about noticing the details of things we take for granted.

In terms of photographic composition, when we see a objects we are familiar with, such as trees and mountains, we tend to pass over them quickly. This leads to issues where we don't notice compositional errors in our pictures until we are home staring at them on our screens.

But what if the image is turned upside down? Do you still pass over the tree in the frame below, or is your mind thrown into a state of trying to work out what the object is?

Upside Down & right way up (again)

Upside Down & right way up (again)

Turning an image upside down breaks our ability to pass over items within the frame easily. In an attempt to understand what we are seeing, we pay more attention to the shapes and tones of the items within the frame. Looking at the two examples on this page, I would like to suggest that when you see the upside down image, this is exactly what is happening in your brain. But when you look at the image the right-way-up, you're now back to scanning familiar objects such as trees, mountains, sky, etc.

So turning an image upside down allows us to abstract the composition down into form and tone.

I guess you may be asking - well how can I use this, if I don't have a view camera like Bruces? I'll let you into a secret - I don't just use this feature with my view-camera - I also use it when I'm editing images at home in Photoshop. It's hugely beneficial to rotate my images 180 degrees - because it allows me to notice flaws in the composition, or to see things that I wouldn't notice otherwise. The interesting thing about this is that once you correct the things you're not consciously aware of, the compositions tend to become much more relaxed and easier for your brain to take in.

So if your camera has the facility to turn your preview image upside down - it might be worth using it from time to time. Set up your composition and then flip the image 180 degrees to look at the frame and see if anything you didn't notice before pops out at you. Additionally, it's worth doing the same exercise with an image once back home and behind your computer screen.

Turning your images 180 degrees is a bit like having a workout for your visual-muscle. Perhaps it's something you might like to consider whilst out in the field, or at the very least, once back home and editing your work.

To be pain free

I decided many years ago that this blog should just be about the creative arts - photography, music, whatever I think is worth talking about from a creative perspective.

I therefore chose to avoid the following: too much of my own private life, political leanings (yes, I do have them), and anything else that I think may not be appropriate for a photography blog. You all come here after all, for your love of photography.

But I am going to break my rule today by telling you that for the past 11 months I was in so much pain that I started to really worry that something very bad was happening to me. Last November I woke up with bad neck pain that seemed to stretch down into the shoulder blades of my back. It didn’t go away and after weeks of it, I realise it wasn’t going to go away. The pain got worse, and then I found that I had weakness in my left arm. I had already been suffering pain (which I assumed was arthritic) in my left hand’s middle two fingers.

Well, things just got worse. I started to have lots of headaches that reached behind my eyes. Each day was the same: I’d wake up in a lot of pain, and as the day went on, it would subside. Only to find the pain-reset button set to FULL the next morning.

I went to two Osteopaths. I went to two physiotherapists. I went to my doctor and was scheduled for an MRI. Six months later I was still in a lot of pain and I now had such weakness in my left leg that I was convinced that I had some kind of tumour or something and that my days were numbered. I was already suffering from periods of feeling very despondent about it all. There was no end in sight.

I suffered the worst pain I’ve ever experienced for 11 months. I said very little on my workshops and tours but it was hard going dealing with it.

I am glad to report that I am now 100% pain free. It has all gone, as quickly as it had arrived 11 months ago. And I wish to share with you what the underlying problem was. It was my teeth. It turned out that I grind and clench my teeth while sleeping. I’ve apparently been doing this for years, which explains the stiff neck I’ve had for a very long time. I just needed a mouth guard and some massaging to remove all the tense muscles.

I had to find a dentist that worked with TMJ (jaw dysfunction). My original dentist referred me to my doctor. My doctor was clueless and sent me for an MRI. One of the osteopaths had warned me that she thought my problem stemmed from my jaw and that I may have to look for a dentist as most of them are pretty useless at diagnosing TMJ.

I sought out a dentist that specialised in TMJ after reading about neck pain on Google. As I say: few dentists can help you but I found one who made me a custom mouth-guard to wear and confirmed I was grinding my teeth. She also suggested i go for regular head-massages to help relieve the tension in my jaw. Which is what I did.

I think the massages helped, but they didn’t cure. The mouthguard made no difference at first. But I think the combination of the two made all the difference. It took about 2 weeks before all the pain subsided.

I feel as though I’ve been given a ‘get out of jail’ card. The dread of living the rest of my life in the pain I was in has been lifted.

And I am better than I have ever been. The slightly stiff neck I had for maybe 10 years has gone. As well as other slight ailments. Seems I was suffering for a long time and didn’t know I was putting up with some pain.

I am now 100% pain free. I’ve never felt better.

So I write this with one intention: if you are suffering similar body pain. Something in your neck that you think is either a pinched nerve, or pain in your arm (nerve pain) or weakness on the side of your body : it may be your jaw that is at the heart of the problem. Seek a dentist out that specialises in TMJ and ask them to check if you are grinding your teeth.

I am pain free.

But no thanks to most of the specialists I went to see. I had to persevere.

I spent a fortune trying to find out what was causing my pain, and I had 5 health specialists unable to help me.

What fixed me was eventually a Thai masseur and a dental mouth guard.

I just feel it’s so easy to get lost in one’s pain and not see a way out of it. Seldom do we hear the success stories, of someone who found a solution and helped. For me, I was left in the dark. Google searching told me about a lot of overlapping conditions that could cause what I was suffering but few articles or forums gave me hope. If someone got fixed, they went silent.

So I hope this post today may be of help to someone. Just one person. And it’s worth it.

Isle of Eigg Workshops for 2021

Isle of Eigg, Scottish Highlands
£628.50

2025, April 7-12, Price: £1,895
2025, September 8-13, Price: £1,895

Initial deposit: £628.5
2nd Deposit of £628.5 due six months before workshop start date

5-Day Photographic Workshop

Introduction

The small island of Eigg contains perhaps one of the most dramatic and photogenic beaches in Scotland: the Bay of Laig & the Singing Sands. With abundant geological features on each beach and the isle of Rum as a perfect backdrop, this location is a dream for any landscape photographer.

We spend all our time on two beaches, which are in walking distance from our accommodation. One is sandy while the other is rocky. To get the most out of this workshop it is best if you are comfortable working on rocky beaches. This trip is suitable for anyone who has regular fitnessand can walk with their camera bag and tripod for up to 30 minutes.

I’ve just listed two more Scottish workshops for 2021 on my workshop page. I will be going back to Eigg (it’s a favourite place of mine that I have been running a workshop on for the past decade). The island is small, we spend all of our time on mostly one beach (which is highly photogenic).

We have private rooms, in small cottages but some of the bathrooms are shared. Eigg is a small island of around 85 people, eight miles long. So there are no hotels, nothing to spend your money on, and as such, it gives a unique Scottish highland experience.

To enjoy this trip, you should be fit enough to walk for 30 minutes over uneven and boggy ground with your camera bag and tripod. The beaches are rocky in places. To get the most out of this trip I would suggest you need to be comfortable being on rocky beaches (some previous clients have not been). We spend our entire time on just two beaches, both highly photogenic.

Re-interpretation

Before I begin my article today, I’d like to make a few points very clear:

  1. There is always a trade-off. When you gain something, you lose something.

  2. Sometimes we like something because we’re attached to how it is.

  3. The two images below, I don’t view one as better or worse. And hopefully you should get beyond this point also. ‘Like’ is a personal preference. It has nothing to do with the validity of an image.

I have just recently chosen to go back to some of my favourite landscapes in Scotland in 2021. Partly it is because I would like a change: It has been many years since I photographed my own home country, and I feel that there has been a big change in my style of photography over the past few years. I’m curious to see how I will approach / react / and photograph, since I am aware that I am looking for different things now.

This is the original image, shot circa 2009, in the Assynt region of Scotland. It is not of Stac Pollaidh, as many people assume.

This is a re-interpretation. I did it, just to see where I may end up based on my current tastes / aesthetics, etc. I realise I’ve learned so much in the past 10 years, so I was curious to see how I may re-interpret the same image.

Well I’m sure you’ve already studied the two images above : both from the same film-scan and reached your own view of which you like more than the other. This article today is not about this. I am not going to say ‘this image is better or worse because of…..’. Instead, I just wish to discuss some other aspects.

Point 1. Familiarisation makes it hard to see it any other way

I personally love the original image, but I’m really not sure how much of this has to do with familiarisation. We become set / stuck in our ways the more we live with how things have been. And this is just as applicable to our older work. Attempting the re-interpretation image has forced me to think about whether I’m attached to the original image because it’s good, or just because I’m overly familiar with it now.

Point 2. How radically different an image can be through editing

Editing / post-processing (I abhor this term personally), is a highly creative place to live. I have never believed that the work is to ‘get it right in camera’. And I’ve always enjoyed the editing / interpretive side of my photography. It’s interesting to know that an image can be edited in many different ways. Editing is an art, it is a skill. It is a life-long endeavour in learning to see what was in the image and bring out the main motifs. Editing isn’t done by learning Lightroom in a few weeks and that’s it. It can really take you places if you don’t mind departing from what was there at the time of the capture.

Point 3. How much I have changed

I don’t know if I have it in me many more to do deeply saturated colour work. I’m wondering if I may return to it in some years to come, but I’m certainly aware that the original image from 2009 isn’t something that I would do any more. There is always a trade off in your own development. I see things in the original image that I love, but I couldn’t do that now if I tried, because it’s not where my aesthetic leanings are. I’ve lost some aspects to my image making, but I’ve gained also. As I said, there is always a trade-off.

Which leads to my last point:

Point 4. The original capture was made by a different me. Edited by a new me. Perhaps this doesn’t work?

Yep, the guy who made the original shot was the ‘Bruce-Percy-2009’ edition ;-) We shed skin, we move on. I’m not too sure it’s a good thing to return to older work that was created by a different you. Because there is in some way a disconnect. I think I would shoot this scene differently now and I think it would be done differently with an aim to edit it a particular way. These days my editing and composition skills are intertwined. Where I once just went out to make images and then see what I could do with them later on. I think that when I compose shots in the field now, I already know what I’m going to do with them when I edit them.

I think if one wishes to return to older work to re-edit it. There has to be a reason. For example, if you ‘see’ something in the work that you can bring out, or enhance then I think it’s valid to return to it. But if you are trying to ‘update the work to match where you are now’, I’m not convinced it will work.

This is what I tried to do with this image. I attempted to edit it to ‘see what I would do with it now, based on who I am now’. And I’m not sure it’s a success. My reasons are, there are too many distractions in the foliage that I probably wouldn’t have shot it this way. So I’m trying to start on an image that isn’t at the right starting point for where I am now.

Conclusion

It’s fun to go back and revisit older work. You can really learn a lot about yourself in the process:

  • How far have you come?

  • Would you shoot the work this way now?

  • What distractions in the work do you see now that you didn’t see at the time of the original creation?

  • Do I want to return to the same places now, that I feel I am looking at things differently?

For me, the last point is the salient one. I am very curious to find out how I will approach photographing in Scotland now that my style has evolved. Will I find some common ground? Will I see new things?

Landscapes can teach us so much about our photography and about ourselves. Find the right landscape in your own development and it can move you forward in ways that other landscape won’t. Returning to a well known place many years later can be very interesting because you will most likely be looking for different things and you’ll therefore see it in a fresh and new way.

I’m aware that my work is always in a state of change. Nothing is ever finished. There should be no rules. Do as you please, return to older work if it’s what you feel you need to do. Re-interpretation can teach us so much. I just don’t think it will always yield better / improved results, but you’ll certainly grow from the experience.

Colour management for book production

I’ve been busy working on the image selection / sequencing and text for my forthcoming book. I’m really pleased with how it is all going. But I am now at a stage where I want to print all of the 100+ images.

I don’t trust monitors for image review.

IMG_1436.jpg

As much as I am very confident that my monitor has been calibrated correctly, and profiled well, I still find that when I print, I’m forced to see things in the print that weren’t so obvious on the monitor. For one, luminance levels of a print can easily be misread on a monitor because our eye is highly adaptable. What may appear bright after staring at it for so long may appear much darker in print. So printing the images out allows me to get a real-world grasp on how the luminance levels are on the print.

That’s one reason to print. But there are many reasons to print and those reasons only become apparent once you have a print in your hands to review. So many times I’ve noticed colour casts, fine detail distractions that weren’t so obvious on the monitor, but once printed, I now notice them - both in the print and more interestingly, on the monitor as well.

Our eyes are highly adaptable, which leads us into tuning out colour casts ‘in our head’. So I’m always looking for a way to force my eye to see things that it has become blind towards. The more you stare at a picture on the screen, the more desensitised you become to it. It’s like tunnel vision of a sort.

So I definitely wish to print out all of the images that have been selected for inclusion in the book. But I want to go one stage further: I’d like to simulate how the images will look when printed on standard proofing paper:

“Standard Proofing Paper has a Fogra 39 certification, which is becoming the European standard. Offering the widest colour gamut available for accurate colour reproductions, this paper provides a base colour, weight and gloss level designed to match colour-critical commercial offset, press applications. Optimised for proofing applications, when used with our Epson UltraChrome K3 Ink with Vivid magenta, this media delivers outstanding short-term stability”

So this week I’ve been printing off some targets to get measured, so that I can have a custom profile built for this paper.

I’ve always printed my images out to verify them, and to give as a hard-copy to the printer. I was advised years ago that having a hard-copy is the ultimate reference when getting someone else to reproduce your work. I’ve been pretty happy with the colour reproduction on the last two books. But this next book will be a test of sorts, because we are working with some extreme edge blacks and off-colour whites.

I think that my optimising of the prints will go a lot smoother, and will be much finer if I am printing them on a standard kind of proofing paper that is close to an off-set press.

I realise this is perhaps of little use to many of you, but I suppose the big message here is - your photographs are never finished until you have them printed and verified. I always find errors and inconsistencies in my work once it’s printed, and if I tune the print to look good, then I know it will also look good on the monitor also. But not the other way around.

Assynt, Scottish Highlands Workshop, February 2021

Assynt & Inverpolly, Scottish Highlands
£688.50

Price: £2,395
Initial deposit: £688.5
2nd Deposit of £688.5 due six months before tour start date

5-Day Photographic Workshop

Date: March 2 - 7, 2026

Introduction

In the far north west lies some of the most distinctive mountains of Scotland. Stac Pollaidh, Suilven, Canisp and Cul Mor dominate the landscape, yet there is an abundance of wide open space. This is real highland countryside with some dramatic coastal scenery to boot.

I thought that it would be nice to spend a bit more time in Scotland during 2021, for some of my trips.

I’m pleased to let you all know that I will be going back to Assynt / Inverpolly region of the Scottish Highlands in February 2021.

This region of Scotland has some of the most distinctive mountains, and lochs.

We should have a lot of nice light in February and maybe many cold-snaps / frost.

It’s been a while since I’ve been here, and I’m really looking forward to it. Especially in February as it is often one of the more ‘frosty’ months in Scotland.

Just click on the image to go to the respective page, if you’d like to learn more.

The three core elements of a good landscape photograph

There are three core elements to a good photograph:

  1. good light

  2. good composition

  3. good exposure

Probably in that order.

Senja-2017-1.jpg

If you get those three core elements in one picture, then you’re almost done. Of course, cameras don’t see the way we see, so I always think that a degree of editing or ‘grading’ is required to bring out what we envisaged. But the same rule holds true for this also: if the material you’re editing is good, it will tell you clearly how it needs to be edited, and you shouldn’t find yourself working so hard.

I believe that if we find ourselves ‘striving’ or ‘struggling’ or ‘putting a lot of work’ into trying to get something to look right, we’re probably working with something that isn’t such a great idea to start with.

That goes for editing, but it also goes for what I choose to shoot out in the landscape also. If it isn’t working, your creative flow will jam up, and you’ll just find it’s like pulling teeth. If the idea is a good one the composition should just flow and it should come together easily.

In the past twenty years we’ve seen a lot of developments in technology. But one thing has remained constant:

Garbage in = Garbage out.

A great idea (read that as a great composition, with great light and a good exposure) is still at the core of good image making.

Nothing has changed. Thankfully.

Screen Grab

Today I was image selecting for my forthcoming Hálendi book.

I had already made a rough sequence of the images for the book, but today’s task was to dig out the master PSD files, and collate them.

And here are some of them. Badly named I might add.

I have maps of Iceland laid out on my desk, and like a detective, I am piecing together where each of the 100+ photos were made. It is bring back memories, and I am realising that the location of an image may not be where I had thought it was.

Once I have them named, I will need to sequence them. And once I’ve sequenced them, I will need to print each one of them out for review.

And no doubt, I’ll need to fine-tune / optimise them for print. That’s going to take me some time, but I am finished my workshops and tours for this year, so I now have plenty of time to work on this.

Loving it. It’s like a review of sorts. It’s a way of checking in on where I am, and where I have been.

Luminous Beings

It’s good to have both visual and also audio stimulation. I personally can’t live without either.